How to Use the Swagelok Gaugeable Preswaging Tool Video
Installation Instructions
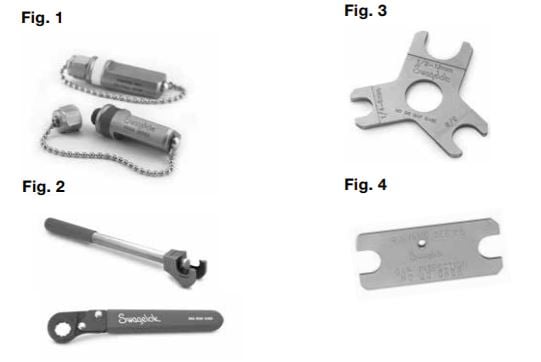
Tools Required for Gaugeable Preswaging Tool Instructions
1. Gaugeable preswage tool will have a colored band
Gaugeable tools are available in sizes 1/4, 3/8, 1/2, and 5/8 in. (6, 8, 10, 12, and 16 mm)
2. Body wrench and nut wrench (Fig. 2). The "How to" video uses a vise, an open-end wrench, and a pen.
3. Standard gap gauge for standard assembly (Fig. 3).
4. Severe service gap gauge for severe service assembly (Fig. 4).
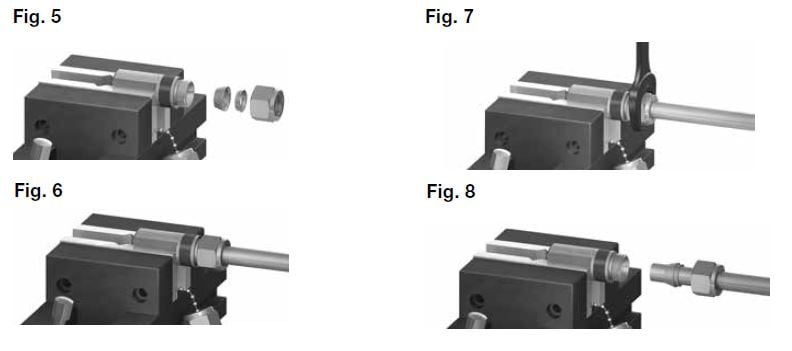
Gaugeable Preswaging Tool Instructions
1. Install the Swagelok nut and ferrules onto the preswaging tool (Fig. 5).
2. Insert the tube into the preswaging tool until it rests firmly on the shoulder of the tool; rotate the nut finger-tight (Fig. 6).
3. While holding the preswaging tool steady, tighten the nut with a wrench until it stops against the collar (Fig. 7).
4. Loosen the nut and remove the tube with preswaged ferrules from the preswaging tool. If the tube sticks, gently rock it back and forth. Do not turn the tube (Fig. 8).
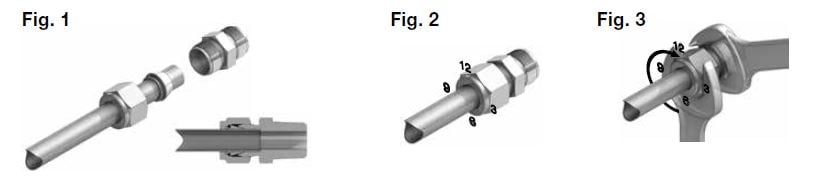
Gaugeable Preswaging Tool, Tube Fitting Installation
1. Insert the tube with preswaged ferrules into the fitting until the front ferrule seats against the fitting body; rotate the nut finger-tight (Fig. 1).
2. Mark the nut at the 6 o’clock position (Fig. 2).
3. While holding the fitting body steady, tighten the nut one-half turn to the 12 o’clock position (Fig. 3).
Note: If assembling fittings for high-pressure applications or high safety-factor systems (severe service), tighten one hex flat further than one-half turn.
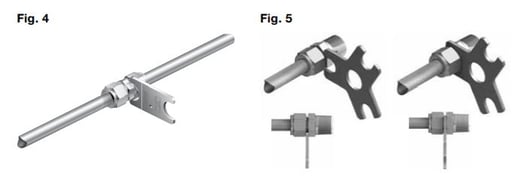
Gaugeability
On initial installation, the Swagelok gap inspection gauge assures the installer or inspector that a fitting has been sufficiently tightened.
If the nut was tightened additionally during installation (step 3), use Fig. 4 for gauging, otherwise use Fig. 5.
Position the Swagelok gap inspection gauge next to the gap between the nut and body (Fig. 5).
- If the gauge will not enter the gap, the fitting is sufficiently tightened.
- If the gauge will enter the gap, additional tightening is required.
Download the Instructions on how to use Swagelok Gaugeable Preswaging Tool (on Pages 74-75 of Swagelok's Gaugeable Tube Fittings and Adapter Fittings catalog)


