
.webp?width=210&height=70&name=StickyLogo%20(5).webp "Swagelok Northern California home page")
Share this
by Jeff Hopkins on 8/8/18 8:30 AM
With a little trial and error and some troubleshooting, you can often make it work
"If the analyzer in your analytical system requires gas but your sample is liquid, the only option is to convert the liquid to gas...Vaporization, done properly, ensures that all of the compounds vaporize at the same time, preserving the sample’s composition."
- Doug Nordstrom, Swagelok Co and Tony Waters, Sampling System Expert
If your sample is liquid and the analyzer in your analytical system requires gas, the only option is to convert the liquid to gas. This process is called vaporization or flash vaporization. As the name implies, you want to turn all the liquid into vapor instantly – without changing the composition.
It's not easy. In fact, sometimes it's not even possible. So make sure it’s really necessary before you try.
Not evaporation
Vaporization is not evaporation. Evaporation occurs gradually with an increase in temperature. Vaporization occurs instantly with a drop in pressure. It’s not possible to vaporize a sample by increasing temperature.
When vaporization is done properly, all of the compounds vaporize at the same time, preserving the sample’s composition. When a mixed sample evaporates, some compounds will evaporate before others, resulting in fractionation. Typically, lighter molecules evaporate first and travel on toward the analyzer, while the heavier molecules remain behind in the liquid phase. That mixed sample is no longer suitable for analysis.
Let’s take a closer look at how to ensure proper vaporization and an accurate analytical result.
Understanding vaporization
The most common tool for the job is a vaporizing regulator, also called a vaporizer. It's a pressure-reducing regulator that can heat the sample at just the right location.
The sample enters the vaporizer as a liquid, then passes through the regulating orifice in the vaporizer. That results in a severe and sudden pressure drop, which vaporizes the liquid. At the same time, heat is applied, which enables the vaporized liquid to remain a vapor. The sample, now a gas, exits the vaporizer and travels to the analyzer.
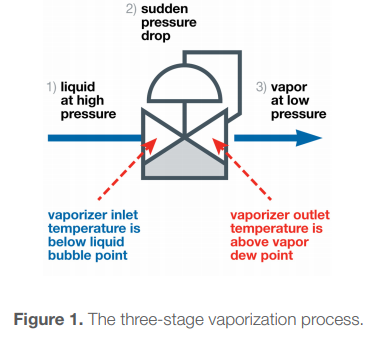
In this delicate process, there are many opportunities for failure. For this short post we'll focus on two main sets of inputs. The first is the composition of the sample. The components may begin to bubble and finish vaporizing at different pressures and temperatures. We’ll need to know what these pressures and temperatures are to successfully manage the process.
The second set of inputs concerns settings of your sampling system: pressure, temperature, and flow. Pressure and temperature are controlled at the vaporizer, while flow is controlled downstream at a rotameter (variable area flowmeter) and needle valve. The first set of inputs tells us what we need to know in order to make the second set of inputs. This takes some trial and error.
How To Manage Vaporization In An Analytical System (5 page Technical Paper)

Understanding your sample
The best way to understand the first set of inputs is with a phase diagram of your system’s particular mixture of compounds. It plots pressure and temperature, and will basically show you three zones. Above the bubble point, the sample will be all liquid. Below the dew point, it’s all vapor. In between is the "no-go zone," the boiling range of the sample. Here, the mixture is part liquid and part vapor, and no longer suitable for analysis. The objective in vaporization is to set the temperature, flow, and pressure so that the sample skips instantly from the liquid side of the no-go zone to the vapor side of the no-go zone.
With pure and nearly pure samples, the no-go zone is tiny. But other samples have such a wide no-go zone that they cannot be successfully vaporized. There's no way to manipulate the variables – temperature, flow, and pressure – in such a way as to avoid fractionation.
Most samples fall between these two extremes.
Industrial Sampling Systems, the definitive reference guide by expert Tony Waters (book excerpt)

Setting temperature, pressure, and flow
In general, at the inlet, you want high pressure and low temperature. At the outlet, you want high temperature and low pressure. But there are limits as to how high and low you can go, and not all of them are completely under your control. Vaporization is basically a balancing act between the variables.
Here is a four-step process for setting your inputs. First, determine the inlet pressure at your vaporizer. This is your process pressure, provided your vaporizer is located close to your sample tap. Higher pressure is better because it allows you to keep the vaporizer temperature higher without boiling the incoming liquid.
Next, set your inlet temperature. You want it low enough that when the sample enters the vaporizer it is entirely a liquid and not bubbling. At the same time, you want it high enough to contribute to the complete flashing of the sample. When you vaporize the sample, the temperature drops, and you don't want it to end up in the boiling range or no-go zone.
The third step is to set the outlet pressure at the vaporizer. Your objective is to drop the pressure below the dew point line. Fourth, set your flow. Flow is set downstream at a valve and rotameter, not at the vaporizer. A high vapor flow moves the sample to the analyzer faster. But with high flow, more heat is required to vaporize the sample. As a rule of thumb, keep the flow rate as low as possible without causing an unacceptable delay in the sample’s travel time to the analyzer.
Another variable is how efficiently the vaporizer transfers heat to the sample. The critical question is how efficiently can the vaporizer replace that heat and keep it flowing to the sample. The more heat the sample can draw, the less its temperature drops during vaporization.
More where that came from
There's a lot more to know about vaporizers than we can pack into a blog post. That's why we have a five-page technical paper that you can download for free. It includes a section on troubleshooting when liquid passes through the vaporizer, and when the sample boils at the inlet.
If you want even more information, see the Swagelok book Industrial Sampling Systems (2013), the definitive sampling systems reference guide by expert Tony Waters.
Swagelok Grab Sampling Systems Application Guide (Catalog)

More like this:
- Tony Waters Wrote the Book on Industrial Sampling Systems (blog article)
- Technical Webinar: Pre-Engineered Subsystems (PDF download & webinar replay page)
- More Swagelok technical articles on analytical instrumentation (section of this site)