
.webp?width=210&height=70&name=StickyLogo%20(5).webp "Swagelok Northern California home page")
Share this
by Jeff Hopkins on 10/23/12 6:00 AM
Swagelok's two-ferrule design can be disassembled and reassembled. Here's how.
One benefit of using Swagelok tube fittings is that they can be disassembled and reassembled many times while retaining the leak-tight seal. Here's a demonstration:
Swagelok's flagship product is our tube fitting, designed to provide a leak-tight seal for pressures up to the suggested allowable pressure rating of the tubing. It is a two-ferrule, mechanical-grip, hinging-colleting type connection consisting of a fitting body, a nut, a front ferrule, and a back ferrule.

Tools for assembly
Manual assembly of the Swagelok tube fitting one inch and smaller is easy and simple. But make sure you have the right tools at hand:
- Two open ended wrenches (or one open-end wrench and a vise)
- Swagelok gap inspection gauge
- Tube cutter or a hacksaw
- File or a Swagelok deburring tool
- Marker
Proper tubing preparation is important. Two common tools used to cut tubing are the tube cutter and the hacksaw. Whichever one you use, the cutting creates burrs that must be removed using a Swagelok deburring tool or a file.
Now let’s take a look at one of the fittings. It is important to note that Swagelok tube fittings come to you completely assembled, finger-tight, and ready for immediate use. Don't disassemble the fittings prior to installation. Disassembly can result in dirt or foreign material getting into the fitting, which can interfere with sealing.
Assembly in three steps
The typical assembly is a three-step procedure. These instructions apply both to traditional fittings and to fittings with the advanced back-ferrule geometry.
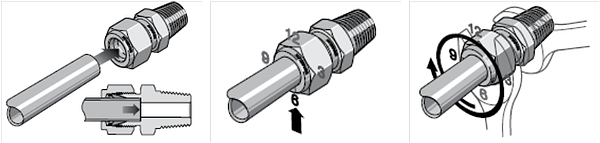
First, fully insert the tubing into the fitting and against the shoulder. Then rotate the nut finger-tight.
Next, mark the nut at the six o'clock position. Marking the nut at six o'clock leaves no doubt as to the starting and ending positions.
Finally, while holding the fitting-body steady, tighten the nut one-and-one-quarter turn to the nine o'clock position. (For one-sixteenth-, one-eighth-, and three-sixteenth-inch, and two-, three-, and four-millimeter tube fittings, tighten the nut only three-quarters of a turn to the three o'clock position.)
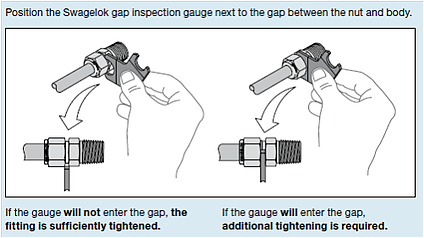
Swagelok's gap-inspection gauge makes it easy to check whether you have tightened the fitting enough on initial installation. To use the gauge, position it next to the gap between the nut and the body. If the gauge will not enter the gap, the fitting is sufficiently tightened. If the gauge will enter the gap, additional tightening is required.

Multiple use
Before you disassemble a Swagelok tube fitting, always depressurize the system. Also mark the tube at the back of the nut and mark a line along the nut and fitting body flats. You'll use these marks to make sure you return the nut to the previously pulled-up position.
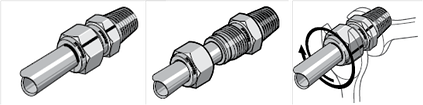
To reassemble, insert the tube with pre-swaged ferrules into the fitting until the front ferrule seats against the fitting body. While holding the fitting body steady, rotate the nut with a wrench to the previously pulled-up position, as indicated by the marks on the tube and flats. At this point, you will feel significant increase in resistance. Tighten the nut slightly.
Do not use the Swagelok gap inspection gauge with reassembled fittings. Also, do not mix or interchange parts with those of other manufacturers.

Get a closer look
For a closer look at Swagelok tube fitting design, pressure ratings, comparative advantages, and more, get our Swagelok Northern California Fittings Resource Collection. It puts all the best info in your hands, in one step—like the latest Installer's Pocket Guide, the Tube Fitter's Manual, the Tubing Data Sheet, essential catalogs, and more.

 Introducing the Tube Fitting Assembly Toolkit
The Swagelok Tube Fitting Assembly Toolkit contains all the hand tools needed for the leak-tight, gaugeable, and safe installation of Swagelok tube fittings in our three most common sizes: 1/4, 3/8, and 1/2 in. Nestled in a locking hard case, you'll find Swagelok preswaging tools, tee wrench, ratchet wrench, tube cutter, tube deburring tool, tube gripper pad.

More articles like this: